Simple Brine Shrimp Hatchery
This easy-to-make hatchery was designed by Brent Mundy.
Constructing the Hatchery
Operating the Hatchery
Manipulating the Cycle
Troubleshooting
Collecting Shrimp to Feed
Care for Larvae
First, empty and clean the two-liter cola bottle with hot water. Use a sharp knife to cut a hole 1 to 1 1/2 inches (about 3 cm) in diameter in the bottom of the cleaned bottle. Next, rinse the pull-up cap from the detergent bottle very well with warm water. The threads on the cap and the two-liter bottle should be compatible. Screw the cap onto the two-liter bottle.
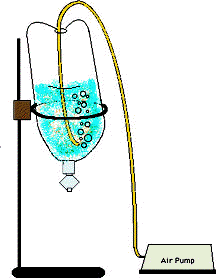
This apparatus will be used inverted. The pull-up cap serves as a reclosable drain at the bottom. Fill the bottle half-full of water and draw a line across the bottle at the water line with a permanent marker. Empty the water back out. Position the air pump so that the air hose reaches the bottom of the inverted bottle. The diagram shows how the setup should look.
Most of the shrimp should hatch within 24 to 48 hours. The length of the cycle depends upon the temperature. The hatched shrimp are orange and can be easily seen through the plastic bottle. When most of the shrimp appear to have hatched, remove the air hose and hold the bottle over a clean shallow pan. After most of the gray shells have floated to the surface, open the drain to empty the newly hatched shrimp and brine into the pan. Close the drain before the last of the brine and the shells enter the pan.
Manipulating the Cycle
To lengthen the cycle place the hatchery in a cooler location or use less (or no) hot water initially.
Troubleshooting
The percentage of shrimp that hatch depends on the temperature and length of the cycle, on whether the brine has been continuously and vigorously agitated, and on the quality of the shrimp eggs used. If, after checking that temperature and agitation are appropriate, only poor hatches are obtained, consider changing to a different brand or supplier.
Squirt the shrimp and brine into the filter to strain the shrimp out of the brine. Discard the brine, then wash the shrimp off the filter and into the container with axolotl water. Distribute the shrimp suspended in axolotl water among the bowls of larvae with the pipette. Feed very young larvae just enough to make their bellies orange. Feed larger larvae generously to forestall cannibalism. It may take a few days of feeding and observing the results to get a sense of how much to feed.
Care for Larvae
Small larvae (< 2 inches or 5 cm long) are fed brine shrimp. Change the water and feed them daily. Keep their bowls clean but never use soap. If necessary, use a little baking soda and salt mixed together as a cleaning agent (two parts baking soda to one part salt). Scrub, then rinse thoroughly. As the larvae grow, split them up into additional bowls. Keep similar sized larvae together. For more information consult the Short_Guide_to_Axolotl Husbandry.